Home » Home Improvement
Category Archives: Home Improvement
Refinishing Your Floors
Hardwood Floor Refinishing Bergen County NJ is a cosmetic procedure that involves sanding the surface and applying a new finish coat. This is less invasive than resurfacing and removing the existing flooring materials.
Clear the work area and use plastic tarps to cover doorways and vent ducts to keep sanding dust from spreading throughout your home. Solid hardwood can typically be refinished up to five or six times before needing replacement.
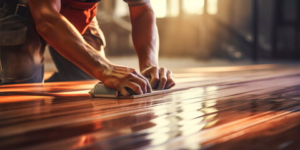
Sanding is the most laborious and time consuming part of any floor refinishing project. It’s also a necessary step to smooth and flatten the surface for staining and refinishing. It’s best done with a walk-behind sander, like a drum floor sander, to get the big areas covered quickly. A smaller hand sander is also useful for the nooks and crannies that the larger machine can’t reach. Before sanding, the floor should be thoroughly cleaned and swept or vacuumed to remove loose dirt and dust. A light mopping with a slightly damp cloth may also help to soften the dust. It’s also a good idea to examine the floor for protruding nails that need to be hammered down or otherwise removed before you start sanding. Protruding nails can clog the sanding belt or pad and leave ugly marks in the floor.
When sanding, it’s important to follow the grain of the wood. Doing so produces a smoother finish and it’s less likely to cause unsightly scratches in the finished product. The floor should be sanded with the grain at least twice, starting with a coarse 36 or 40-grit paper and then moving to finer 80, 100 and 120-grit papers as needed. Always sweep or vacuum in between each grit change to clear away residue from the rougher abrasive that could scratch the floor later.
While the large area of the floor is being sanded, use the edger to sand the edges and corners. It’s a common mistake to overlook these areas, and they can create a jarring contrast with the main expanse of the floor. It’s also a good idea, once the floor is sanded to the proper consistency, to do a final pass with a 120-grit paper to blend the straight sanding cut of the drum sander with the circular sanding cut of the edger.
While sanding, it’s essential to wear appropriate protective equipment. A respirator or face mask is recommended to prevent inhalation of the abrasive dust produced by these machines. Eye protection is also a must, as the dust can cause irritation. It’s a good idea to wear gloves as well to protect against splinters.
Staining a wood floor is a rewarding DIY project that can transform the appearance of your entire home. To make sure that your staining project goes smoothly, it is important to plan ahead and take your time. Be sure to test your stain in an inconspicuous area before applying it to the whole floor, and follow the instructions for your specific type of stain to ensure that you achieve a beautiful and even result. You can also consider water popping the floor before staining it to help prevent blotching and to make the color appear darker.
There are two main types of stain for wood floors – dyes and pigments. Dye stains are transparent and soak into the surface of the wood to change its color. Pigments on the other hand act more like paint and obscure the grain of the wood. Pigment stains can be oil or water-based, and are available in almost unlimited colors.
To decide which kind of stain you need to choose, first consider the colors you would like your floor to have. A good tip is to use a color wheel to help you select the best colors for your particular floor. After you have decided on the colour, you should test it out on a scrap piece of wood or your baseboards to ensure that it will look perfect when applied to the floor.
The next step is to prepare the floor for staining by vacuuming up any dust left behind, and cleaning with mineral spirits. The room must be well ventilated since this step involves using oil-based solvents, which can produce harmful vapors. Once the floor is prepared, begin staining in sections that are long and wide enough to allow you to work without having to walk on the stained area.
When applying the stain, be sure to apply it evenly with a lambswool applicator. If you have a lot of different colors of stain, mix them together before you start so that they will come out consistent and even on your floor. If you are doing more than one coat, wait for the first one to dry completely before you apply the second coat.
Staining the floor can change its color and give it an updated look. It can also help protect the wood and prevent it from being damaged by moisture and other environmental factors. It is important to apply the stain as soon as possible after sanding. Bare wood quickly weathers, and moisture can easily penetrate the surface. This can cause the grain to raise, and it will cause the stain to become blotchy.
Before applying the stain, you should make sure there is proper ventilation and that you are wearing a mask to avoid inhaling any fumes. You should also test the stain in an inconspicuous area to ensure it is what you want. This will allow you to see how it looks and adjust the color if necessary. After testing the stain, you can begin working on the rest of the floor. It is best to work in small sections at a time.
If you want to enhance the appearance of your floors, consider using a water-based stain. This type of stain dries quickly and is less likely to leave residue on the surface. Water-based stains are also environmentally friendly and contain fewer VOCs than traditional oil-based stains.
When applying the stain, you should follow the manufacturer’s instructions for coverage and drying times. It is also important to wipe away any excess stain within five minutes of application. This will help prevent blotching.
Once the stain has dried, you can apply a polyurethane finish to protect the floor. You can use a high-quality brush or roller to apply the finish, and most floors will benefit from two or three coats of finish. The finish can be glossy or semi-glossy, depending on your preferences. Once the final coat of finish has dried, you can move your furniture back into the room and enjoy your newly-refinished floors.
Refinishing your floors can add value to your home and enhance the beauty of your property. If you are considering refinishing your floors, be sure to contact a reputable professional to get the job done right. It is worth the investment to ensure your floors last for years to come.
Hardwood flooring is a timeless choice for home decor, and it can also increase the value of your house. Refinishing your wood floors every so often will keep them looking their best and prevent future damage. A good floor finish will seal the pores and protect against water, stains, scratches and dirt.
A variety of finishes are available for your hardwood floors, including polyurethanes, lacquers and oils. Choose a finish that provides the look you want and meets your budget. Lacquers provide a smooth, glossy finish and are available in different colors to enhance your decor. Oils create a more natural-looking finish that is slightly rough to the touch.
After you sand your wood floors, you need to protect the newly finished surface and furniture from dust, dirt and grit. Cover your walls and furniture with plastic sheeting and tape to contain the dust. You should also remove baseboards and nailheads from the wall. This will make it easier to reinstall them later when the floor is complete.
If the original finish on your wood floor was wax, you will need to remove all traces of it before you can apply the new finish. Start by rubbing the whole floor with 180-grit sandpaper, then hand-sand the corners and other nooks that the buffer can’t reach. When you’re done, the floor should be wiped down with a terry-cloth mop and a solution of 10 parts water to 1 part white vinegar.
Today’s most popular wood floor finish is a polyurethane. It adds thick layers of protective, stain-resistant coating that help your floors last a long time. It’s available in both oil-based and water-based varieties, with the latter having the reputation of being eco-friendly. Water-based varieties dry clear, while oil-based have a slight amber tint.
Another popular choice is a shellac finish. Its organic composition includes beeswax, carnuba and linseed oil and sometimes contains other natural ingredients. It can be applied in multiple thin coats, and buffed with steel wool, pumice or rotten stone to achieve a very high-gloss sheen. It’s slow to dry, but it is a durable and beautiful choice for your floors.